Environment setup
In order to run simulations on the SpiNNaker using PyNN, we need to set up a development environment with the appropriate packages and configure the connection between the board and our work machine. The project repository should be cloned on the work machine. From the CLI,
git clone https://github.com/ljazzal/spinnaker-tutorial.git
cd spinnaker-tutorial
Installation
Before starting, it is important to have python3.8 and virtualenv installed on the work machine. It is then easiest to set up a python virtual environment to ensure the correct project dependencies get installed. The virtual environment venv can be created locally with the following command
virtualenv -p /usr/bin/python3.8 venv
and activated
source venv/bin/activate
If the environment has been successfully activated, a (venv) will prepend the CLI (to deactivate it, simply run deactivate from the CLI). It is a good idea to verify the python version with
which python
# <absolute-path-to>/venv/bin/python

python --version
Next, the required python dependencies can be installed and setup.
pip install -r requirements.txt
python -m spynnaker8.setup_pynn
To configure SpyNNaker, a python interface to the SpiNNaker system, the configuration file .spynnaker.cfg is generated in the user's home directory.
python -c "import pyNN.spiNNaker as sim; sim.setup(); sim.end()"
Network configuration
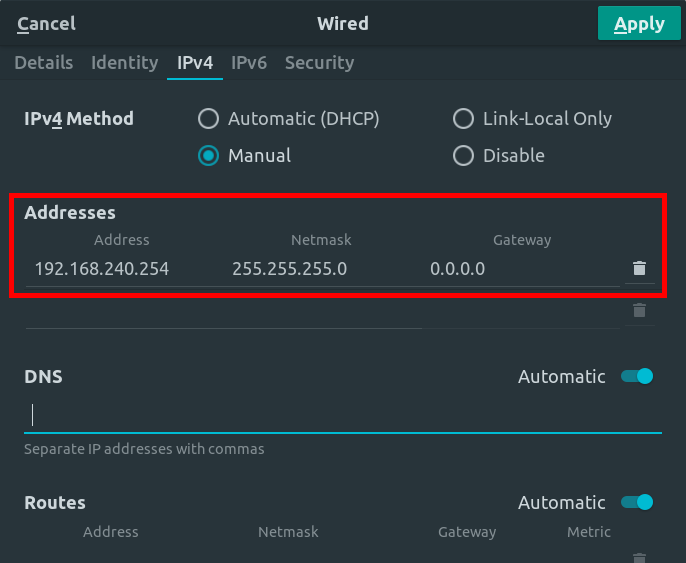
By default, the 48-chip SpiNNaker board (version 5) has IP-address 192.168.240.1. These settings should be entered in the configuration file ~/.spynnaker.cfg.
[Machine]
machineName = 192.168.240.1
version = 5
For the next step, the work machine should be connected to the bottom-left Ethernet port of the SpiNNaker board (positioned such that the logo is upright) and the power adapter connected to the board on the right hand side. On the work machine, the network interface from the wired connection will be up and it should be configured to be on the same network as the SpiNNaker board.
From the CLI, the connection can be checked by pinging the board
ping 192.168.240.1
# 64 bytes from 192.168.240.1 (...)
# 64 bytes from 192.168.240.1 (...)
Verification
The setup can be verified by running a PyNN example simulation.
# Download the examples
wget https://github.com/SpiNNakerManchester/PyNN8Examples/archive/refs/tags/Spinnaker6.0.0.zip

# Extract
unzip Spinnaker6.0.0.zip

# Run example
python PyNN8Examples-Spinnaker6.0.0/examples/va_benchmark.py
If the setup was successful, the terminal will quickly fill up with logs as the simulation is transfered and run on the board. The output should look something like this:

NEST installation from source (Optional)
While we ultimately want to run simulations on the SpiNNaker board, PyNN supports many backends which can prove useful to the development of simulations.

Unfortunately, each backend supports a different subset of the PyNN library. However, significant overlap was found between the SpiNNaker support and the NEST support. For this reason, we have used NEST as a complementary, "off-board", alternative for development. While not required for the tutorial, the following instructions detail the installation of the latest NEST release from source for future reference.
Installing NEST from source may be desired to build in specific extensions or to have access to the latest features. These instructions are independent from the previous sections and therefore, the virtual environment can be deactivated (with deactivate at the CLI).
The following instructions will install NEST in /opt/nest, but a different directory may be used. sudo privileges are (most likely) required to install in this directory.
# Create directory
cd /opt && sudo mkdir nest

# Change ownership to current user (not required if NEST is being installed in a home directory)
sudo chown -R $USER:$USER /opt/nest
cd nest
The latest release can be retrieved here.
# Download latest release
# TODO: update to NEST3.0
wget https://github.com/nest/nest-simulator/archive/refs/tags/v2.20.1.tar.gz

# Extract
tar -xzvf nest-simulator-2.20.1.tar.gz

# Create build directory
mkdir nest-simulator-2.20.1-build
cd nest-simulator-2.20.1-build
The build process supports a number of CMake options. For instance, to use NEST as the PyNN backend, the python binding (PyNEST) will be needed; it is included with the flag -Dwith-python=3.
cmake -DCMAKE_INSTALL_PREFIX:PATH=/opt/nest/ /opt/nest/nest-simulator-2.20.1 -Dwith-python=3
The output of cmake can be inspected to ensure that python support has been included (Python bindings: Yes). Then, NEST can be compiled and installed with
make                # slow
make install        # fast
make installcheck   # slow
Finally, NEST environment variables will need to be loaded into the active bash session. The following command will allow these variables to be automatically loaded each time a session is opened.
echo 'source /opt/nest/bin/nest_vars.sh' >> ~/.bashrc
source ~/.bashrc
To verify that the installation was successful, the NEST version can be printed to the console
python -c "import nest; print(nest.version())"